Melissa McIntosh, Lakeside Longarmer ~ Weekend Takeover
Considerations when planning quilting...

Sometimes you want to quilt a quilt yourself. Sometimes you want to really collaborate with a longarmers and bring ideas to the table. Sometimes you want to hand over the quilt, say work your magic…but you still secretly want to know what goes on in a machine quilters mind. If any of these are you… read on!
By the way...if you want to collaborate with a longarmer, let me suggest you check out my website for tips how to prep a quilt top for best results. Also, I would LOVE to collaborate with you! Let's connect! www.lakesidelongarmer.com
Back in 2018, Jackie White of jackiewhitequilts.com asked me if I would test 52 blocks for her (which were really 54 blocks, go figure!) I happily agreed, as I am a lover of Samplers, Quilt Alongs, and of Jackie. I am also far too impatient to quilt only one block a week, so was secretly very excited to crank out the whole quilt at my leisure!
I love Samplers because they are always interesting to quilt! Depending on the setting they can lend themselves to all styles of quilting: edge to edge, semi-custom, and full on custom. The trickiest part of the quilting process is figuring out what quilting choices will enhance your piecing and layout, not overwhelm it, or make it look downright wonky.
I quilted my take on the 52 blocks using three different methods, to help illustrate how the quilting make or break a sampler quilt.
Thread Choice

BEFORE talking about the quilting, I want to quickly mention thread choice. Jackie wrote this pattern to include light, medium, and dark values, and unless you are setting out to make an heirloom competition quilt, there is no need to constantly be changing colours! In my personal experience, picking a thread colour that blends into the colours on the quilt top will give you more confidence in your abilities, and create a texture that enhances the piecing. Pick a thread that blends with the lightest colour on the top, auditioning threads by unspooling your choices across a section of top. I’ve learnt the hard way that a light coloured thread on dark fabric will always look better than a dark thread on light coloured fabric. The light colour looks polished and purposeful, while the dark thread tends to look more "chicken scratch-ish” no matter how neat your stitching.
I would be remiss to not mention variegated threads. While some people swear by them when quilting a sampler (because yes, they are SUPER beautiful and fun,) the control freak in me really dislikes them. I can’t predetermine where the colours will land, and that often means unintentionally stitching a colour of thread too dark for the fabric underneath it, see above "chicken-scratch-ish” comment.
I am thread obsessed, so I could go on and on about thread specifics, and bobbin choice, but I don’t want to lose you before I get to the good stuff! Contact me directly, lakesidelongarmer@gmail.com, anytime, if you ever want to dive into my thready opinions. I’m always excited to talk thread, or batting, for that matter!


Edge to Edge Quilting
Edge to edge quilting means not taking all of the quilt top’s individual shapes, seams, and points into consideration (that would be considered Custom Quilting.) Edge to edge quilting, also referred to as Allover quilting, means exactly what it sounds like, a design stitched over the entire top, regardless of piecing. NOTE: The examples of Edge to Edge quilting I show here are done using a computerized system, but the suggestions are all applicable to freemotion quilting, as well as hand-guided pantograph quilting.
CAUTION, controversial statement ahead!!! No sampler, not even an heirloom, will be done a disservice with a properly selected edge to edge design. Yep, I said it. Custom quilting is NOT always the answer. Edge to edge quilting is NOT a cop out, or a low budget choice, or just something to get it done! It can be an effective and beautiful quilting choice. The trick is to select an appropriate design.
As a longarmer I have two rules, and one guideline that I always start with when selecting an edge to edge design. These are my opinions, based on my aesthetic preferences. Please don’t yell at me, because I am also Canadian, so I politely and apologetically avoid confrontation at all cost. :-)
Pick consistent patterns that create texture, but do not put illustrative pictures allover the quilt based on the theme of the fabric. Illustrative pictures can make a quilt very busy and are often hard to read. Just because there are trucks in the quilt, doesn’t mean that trucks are the best idea to put all over the quilt. If you want to take the trucks into consideration, can you find a textural design that suggests the wheels of trucks, or the flames painted on the side of Hot Wheels? While illustrative designs can work nicely on large swaths of negative space, they tend to overwhelm sampler quilts.
Take into consideration the shapes in the piecing. My rule is that if the piecing is straight, pick a curvy design. If the piecing or applique is curvy, pick straight designs. In the case of the 52 Blocks 52 Weeks Sampler, I would recommend curvy edge to edge designs until I was blue in the face. Here is why: If your piecing is not 100% precise, and you put a straight line beside it, it will stick out like a sore thumb. Even if you can’t pinpoint why, there will be a wonky feeling when you look at the quilt. The same is true if your piecing is precise, but your straight lines get a tiny bit off. It will look wonky. Finally, if you are quilting using angular straight lines, but the angle is not the same as the angles in the piecing… you got it… wonky. Also, using a contrasting design helps the piecing maintain all of its glory, and allows the quilting to be secondary. I quilted one section of my quilt to illustrate the effectiveness of curves on straight piecing. The design “Raindrops on Water” has extremely consistent spacing, and gentle curves.
Once you have considered the shapes in the piecing, and remember the suggestion (sounds more Canadian than “rule,” right?) not to put a images across the quilt, you can look to the fabric for clues to choose your curvy design. I thought of these blocks as rather traditional, but set them in a more modern setting, and choose bright prints and solids. To combine these two worlds, I chose a modern take on two traditional curved quilting designs, “Baptist Clamshells.” I quilted another section of the quilt with a curved design that has extremely consistent spacing that offers a great texture. I also quilted this quilt once before, using an hourglass/wavy shape inspired by the print in several of the fabrics.
Semi Custom Quilting
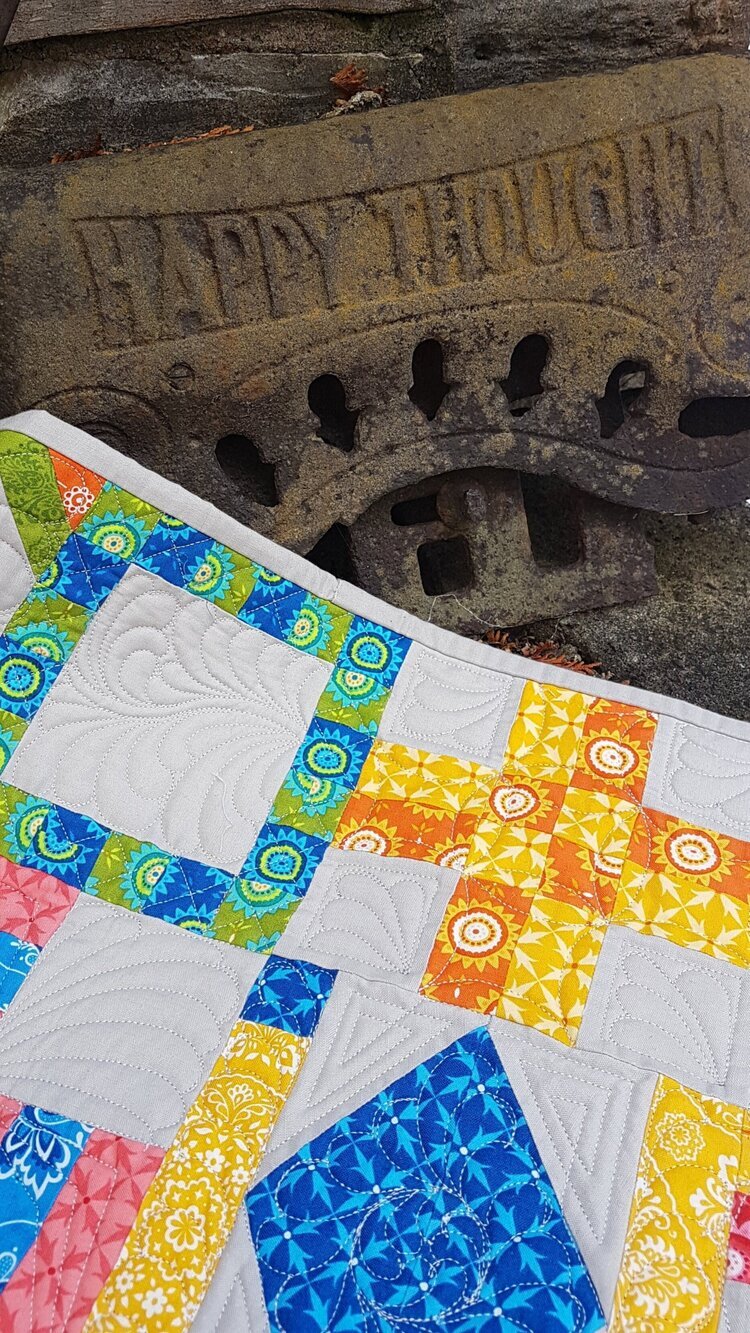
Choosing Semi Custom or Custom quilting starts, for me, with considering the setting. Semi Custom is a happy medium between edge to edge quilting, and full custom. It allows you to highlight particular aspects of the top, by letting others fade into the background. I consider my final quilt as Semi-Custom quilted, since there are large areas of Edge to Edge designs, with two and a bit of the rows Custom quilted.
When to consider semi-custom quilting:
If you have borders that would lend them selves to special treatment. For example, if you have wide borders with solid or tone-on-tone fabrics, you might want to spend a little extra time/effort/money, and have them treated separately with a traditional cable or feather motif, or a modern geometric echo border reminiscent of Baptist fans.
If you have put sashing between all of the blocks. A semi-custom treatment with sashing may include a motif or quarter inch seam echo in the sashing, stitching in the ditch around the outside of the blocks, but covering each separate block with a consistent design, such as a feathered wreath or continuous curve design. Striking secondary designs can arise when taking this approach and can really help move your eye around the quilt.
If you want to highlight any blocks in particular. Even a quilt set like mine, without sashing, can lend itself to semi-custom quilting. You can apply an edge to edge design to all but a few favourite blocks, and really highlight the piecing in those blocks. For example, several blocks have large empty centres. If you have used a solid, or tone-on-tone print, these are fun little places to consider adding pops of intricate quilting.
Did you incorporate a panel? Semi-custom quilting can help that panel stand out OR blend in.
Full Custom Quilting

Full custom quilting takes EVERYTHING into account. It can add secondary designs by combining blocks, or adding “faux piecing” created with textures in the quilting. There is nothing that custom quilting can’t do, and keeps life interesting, especially when dealing with a sampler quilt, since each block is a little bit different.
Because full custom quilting is artwork, it is difficult to give specific suggestions. There are a LOT of things to take into consideration, especially personal preference and taste. If you are hiring a longarmer, there is generally a collaborative design process. Another hint for hiring a longarmer to custom quilt your sampler, if you are at a loss for ideas, is to browse Instagram and find a professional that shares your preferences. Find someone whose work you consistently admire, reach out to them, and take a leap. Most of us accept quilts through the mail. Tell them, “It’s up to you!” “Decide for me.”
Your sampler could be a great candidate for custom quilting if you have large areas of negative space (solid-ish background), solid and/or wide sashings, solid fabrics.
My most general (albeit technical and potentially confusing) piece of advice if you are going to tackle custom quilting on this project, is to have three levels of density, made up of consistent motifs. For example, I tried to consistently use high density echo quilting, medium density feather motifs, and low density point to point designs (either straight of continuous curve.) Once you decide on your three main designs, you can have fun combining them in various ways in every block.
Bonus Advice
If you start quilting and don’t know if you like what you are seeing, STOP! Be it your thread choice, or your quilting designs, just. stop. now. While I have heard the advice, “Just keep going, it will grow on you,” and while I am a believer in the quilt looking much different when you are not staring at it so closely, I have learnt my lesson the hard way. If my gut is saying something just isn’t right, I need to listen to it. Whenever I have second guessed my self, ignored my gut, and kept going, I have regretted it. If I’m unsure of the thread colour, or quilting design right when I am beginning to stitch, I am probably going to really hate it by the end.